

1. 환경
•
Host : Ubuntu18.04
•
Guest : linux kernel 4.7 → qemu 이용
$ sudo apt-get install qemu qemu-system
$ git clone https://kernel.googlesource.com/pub/scm/linux/kernel/git/torvalds/linux
$ git checkout v4.7
Bash
복사
해당 커널은 가져오면 다음과 같이 linux 폴더안에 여러 파일들을 확인할수 있다
╭─wogh8732@ubuntu ~/Desktop/kernel_study/for_qemu/linux ‹523d939ef98f*›
╰─$ ls
arch Documentation ipc Makefile net security vmlinux
block drivers Kbuild Makefile.orig pie.patch sound vmlinux.o
certs firmware Kconfig mm README System.map
COPYING fs kernel modules.builtin REPORTING-BUGS tools
CREDITS include lib modules.order samples usr
crypto init MAINTAINERS Module.symvers scripts virt
╭─wogh8732@ubuntu ~/Desktop/kernel_study/for_qemu/linux ‹523d939ef98f*›
C
복사
이제 시작해보자.
2. 리눅스 커널 빌드
우선 참조한 블로그를 토대로 진행을 할예정인데, kgdb를 이용하기 위해서 미리 설정을 해줘야한다.
필요한 패키지들을 설치하자
$ sudo apt-get install build-essential libncurses5 libncurses5-dev bin86 kernel-package libssl-dev bison flex libelf-dev
출처: https://harryp.tistory.com/839 [Park's Life]
C
복사
2.1 커널 이미지 빌드
이제 위에서 말한 kgdb를 위한 설정을 해야한다. (linux 디렉토리에 들어가서)
•
make defconfig
각 arch 마다 기본 config 가 존재하는데, 이것이 바로 defconfig 파일이다.
arch/x86/configs/* --> x86 기반 arch 의 defconfig 파일들 모음.
arch/arm/configs/* --> arm 기반 arch 의 defconfig 파일들 모음.
•
make meuconfig
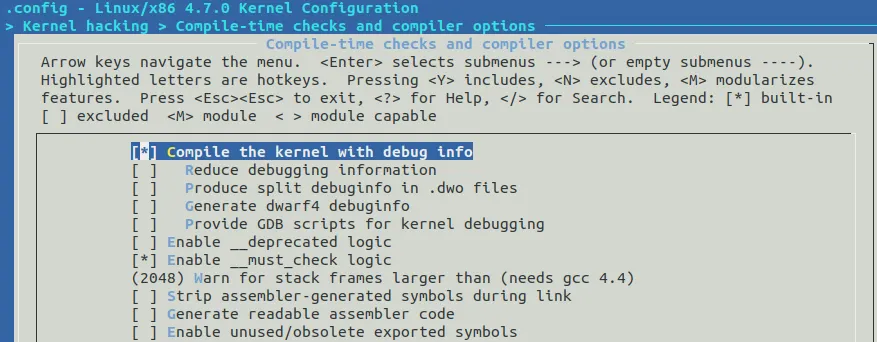
kernel hacking → Compile-time checks and compiler options → 맨위에꺼 체크
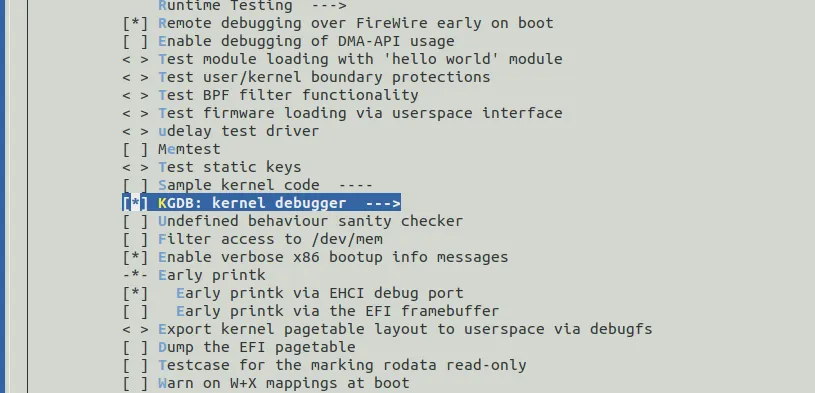
kernel hacking → KGDB: kernel debugger 체크
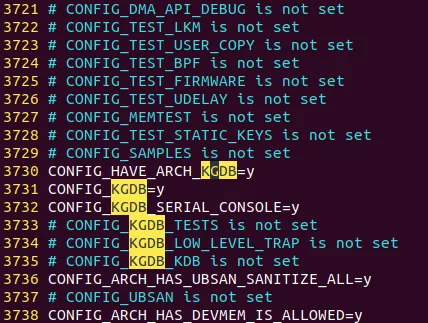
위 옵션들을 체크하고 저장하고 나오면 체크한 설정들을 기반으로 .config 파일이 생성된다.
•
make → 커널 빌드
makefile을 보면 .config 파일을 참조하여 커널을 빌드하게끔 되어있다. 여기서 나는 gcc 관련 에러가 나와서 기존 gcc 버전을 7에서 6으로 낮추니까 됐다. 빌드에 성공하면 커널이미지 파일이 arch/x86/boot 하위에 bzimage 이름으로 생긴다.
╭─wogh8732@ubuntu ~/Desktop/kernel_study/for_qemu/linux/arch/x86/boot ‹523d939ef98f*›
╰─$ file bzImage
bzImage: Linux kernel x86 boot executable bzImage, version 4.7.0+ (wogh8732@ubuntu) #3 SMP Mon Nov 23 22:38:21 PST 2020, RO-rootFS, swap_dev 0x6, Normal VGA
C
복사
2.2 rootfs 만들기
이제 파일시스템을 만들어야한다. 파일시스템에 관련해서는 아래의 내용을 참조하면 된다.

빌드한 커널을 이용하여 qemu 동작시 루트파일시스템을 추가해야한다. 따라서 busybox를 이용해서 rootfs을 만들자. 우선 busybox를 다운받자
$ wget https://busybox.net/downloads/busybox-4.7.tar.bz2
$ tar -xvf busybox-1.31.0.tar.bz2
$ cd busybox-1.31.0
╭─wogh8732@ubuntu ~/Desktop/kernel_study/for_qemu/for_busybox/busybox-1.31.0
╰─$ ls
applets debianutils LICENSE procps
applets_sh docs loginutils qemu_multiarch_testing
arch e2fsprogs mailutils README
archival editors Makefile runit
AUTHORS examples Makefile.custom scripts
busybox filter_log Makefile.flags selinux
busybox.links findutils Makefile.help shell
busybox_unstripped include make_single_applets.sh size_single_applets.sh
busybox_unstripped.map init miscutils sysklogd
busybox_unstripped.out _install modutils testsuite
Config.in INSTALL networking TODO
configs klibc-utils NOFORK_NOEXEC.lst TODO_unicode
console-tools libbb NOFORK_NOEXEC.sh util-linux
coreutils libpwdgrp printutils
C
복사
busybox를 잘 다운받았다면, 해당 폴더에 들어가 빌드를 하자
•
make defconfig
•
make menuconfig
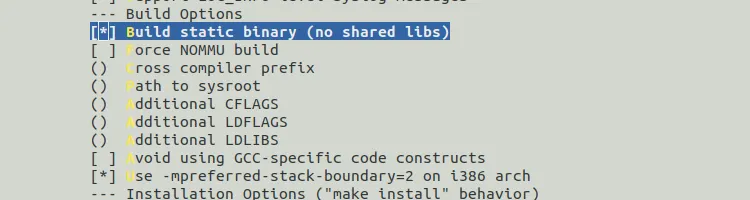
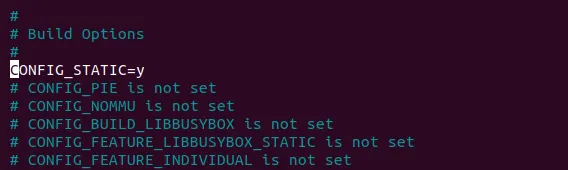
setting → —Build Options 에서 Build static binary 체크
qemu로 리눅스 커널을 올릴때, 디폴트 라이브러리들이 없으므로, 모두 static으로 라이브러리를 빌드되게 하는 옵션이다. 따라서 qemu에서 실행시킬 바이너리들을 빌드할땐 gcc - static 옵션을 무조건 붙여야한다.
menuconfig 화면을 나오면, .config 파일에 CONFIG_STATIC=y 가 설정되어 있는것을 볼수있다.
•
make busybos → 빌드
•
mkdir _install
•
make CONFIG_PREFIX = _install install
╭─wogh8732@ubuntu ~/Desktop/kernel_study/for_qemu/for_busybox/busybox-1.31.0
╰─$ cd _install
╭─wogh8732@ubuntu ~/Desktop/kernel_study/for_qemu/for_busybox/busybox-1.31.0/_install
╰─$ ls
bin linuxrc sbin usr
C
복사
이렇게 나오면 정상적인 빌드가 완료된것이다. 이제 위 4개의 디렉토리를 묶어서 rootfs를 만들자아아아아 그전에 여기서 공부한 커널 모듈을 디버깅하기 위해 요 안에 아래의 코드를 빌드해서 넣어보자.
chardev.c
makefile
find . | cpio -H newc -o | gzip > rootfs.img.gz
cpio는 파일 시스템 압축을 위한 명령어라고 보면 된다. 위 명령어를 치면 rootfs.img.gz가 생성되고, 이게 바로 rootfs이다.
3. qemu 실행
위에서 만든 커널 이미지, rootfs 를 가지고 qemu 위에서 돌려보자
$ nano boot.sh // 경로는 알아서 잘 주길
console=ttyS0 oops=panic panic=1 quiet kaslr
---------------
#!/bin/bash
qemu-system-x86_64 \
-m 256M
-kernel ./arch/x86/boot/bzImage \
-initrd ../for_busybox/busybox-1.31.0/_install/rootfs.img.gz \
-append "root=/dev/ram rdinit=/bin/sh kgdboc=ttyS0,115200 kgdbwait" \
-serial pty
C
복사
◦
-m : 할당할 램 사이즈
◦
-kernel : 만든 커널 이미지
◦
-initrd : 초기 ram disk를 rootfs로 만들걸로 로드해서 부팅
◦
-append : rootfs 위치, 초기 부팅후 실행 스크립트(여기선 쉘),
▪
kgdbwait → 부팅후 gdb가 붙길 기다리게함
◦
(추가)
▪
-nographic : qemu 그래픽안뜸
▪
-s : remote로 붙어서 디버깅하기 위함. 포트는 1234임(디폴트인듯)
▪
-smp 4 : cpu 4개 할당
부팅 스크립트를 만들고 실행을 시키면 아래와 같이 qemu가 동작한다.
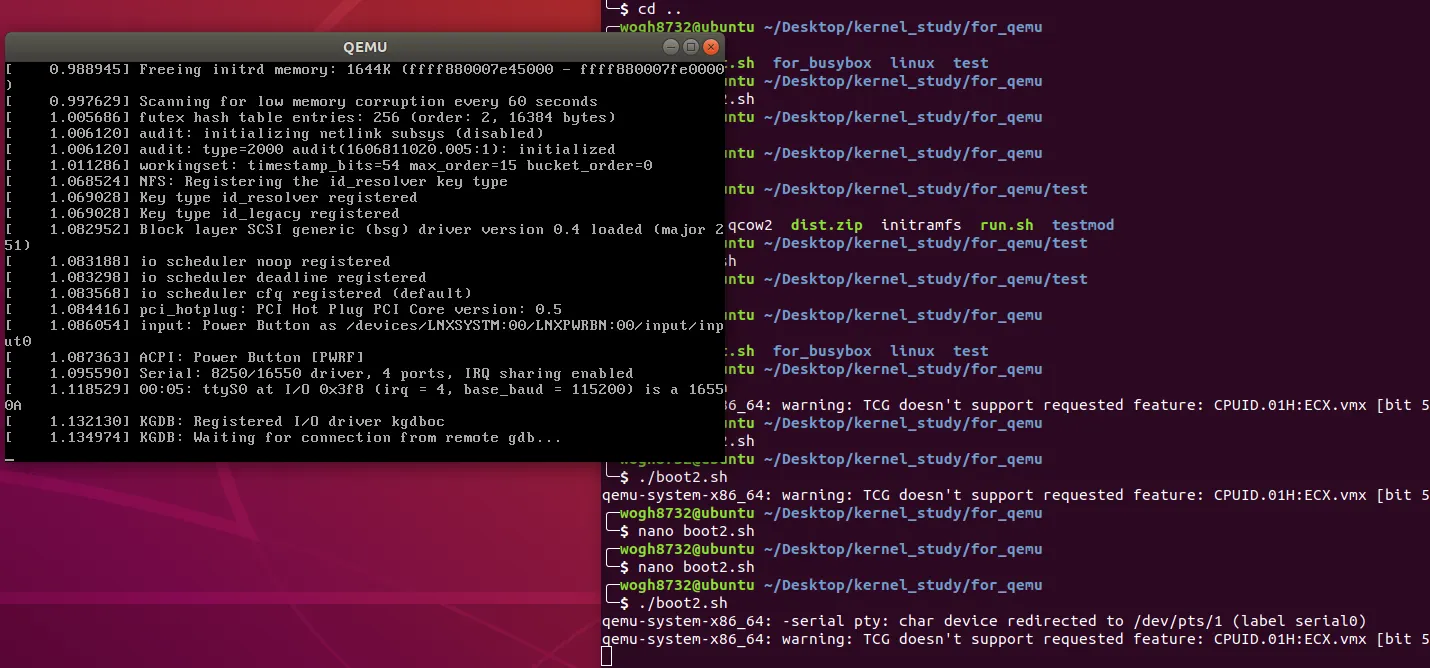
왼쪽이 qemu인데, 로그 메시지를 잘보면
waiting for connection from remote gdb...
라는 로그를 볼수 있다. 즉, 커널 부팅후 아까 설정한 쉘을 띄우기 전에 gdb가 붙기를 기다린다. 이제 Host에서 붙어보자. host에서는 boot.sh의 serial pty 설정으로 인해 시리얼로 붙을수 있게 된다. 정확한 시리얼은 host에서 로그를 보면
qemu-system-x86_64: -serial pty: char device redirected to /dev/pts/1 (label serial0)
즉 /dev/pts1/1로 붙으면 된다.
4. 디버깅
linux 폴더로 이동하면 vmlinux가 있다. 아까 커널을 빌드했을때 menuconfig 에서 Compile the kernel with debug info 옵션을 선택했기 때문에 디버깅 심볼들을 포함해서 커널 이미지가 생성된다. 즉 커널을 빌드할때 vmlinux 바이너리에서 Instruction set을 뽑아내어 bzImage(커널 이미지)가 만들어지는 것이다.
따라서 Host에서 guest 커널에 붙으려면
◦
gdb vmlinux
◦
target remote /dev/pts/1
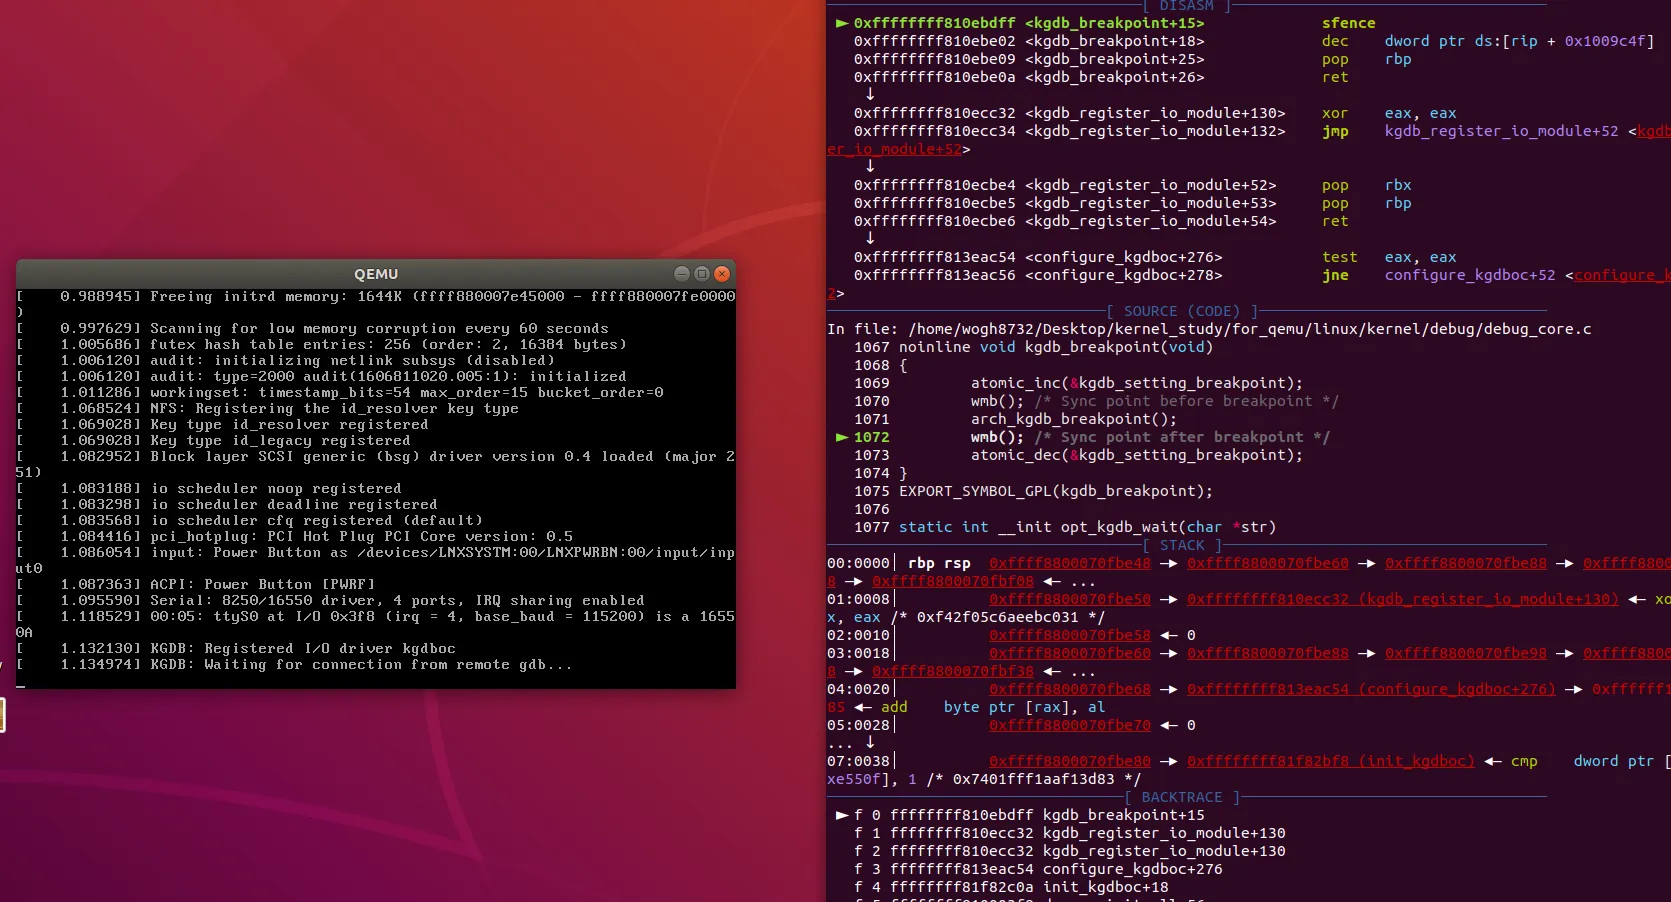
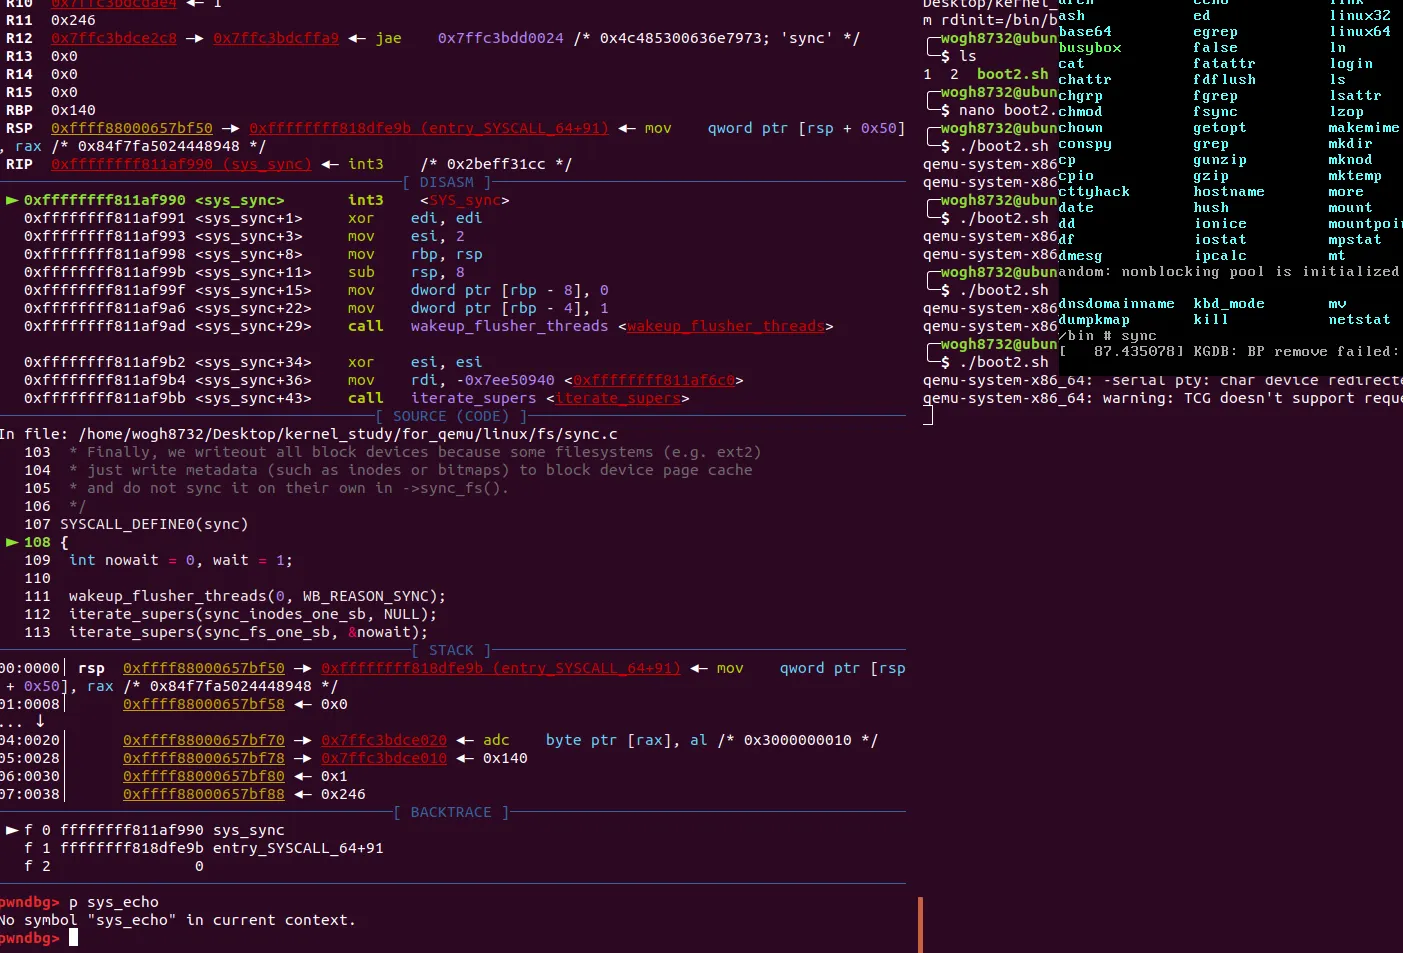
guest에 붙었다. 테스트로 sys_sync함수에 bp를 걸어보자
◦
b sys_sync
◦
c
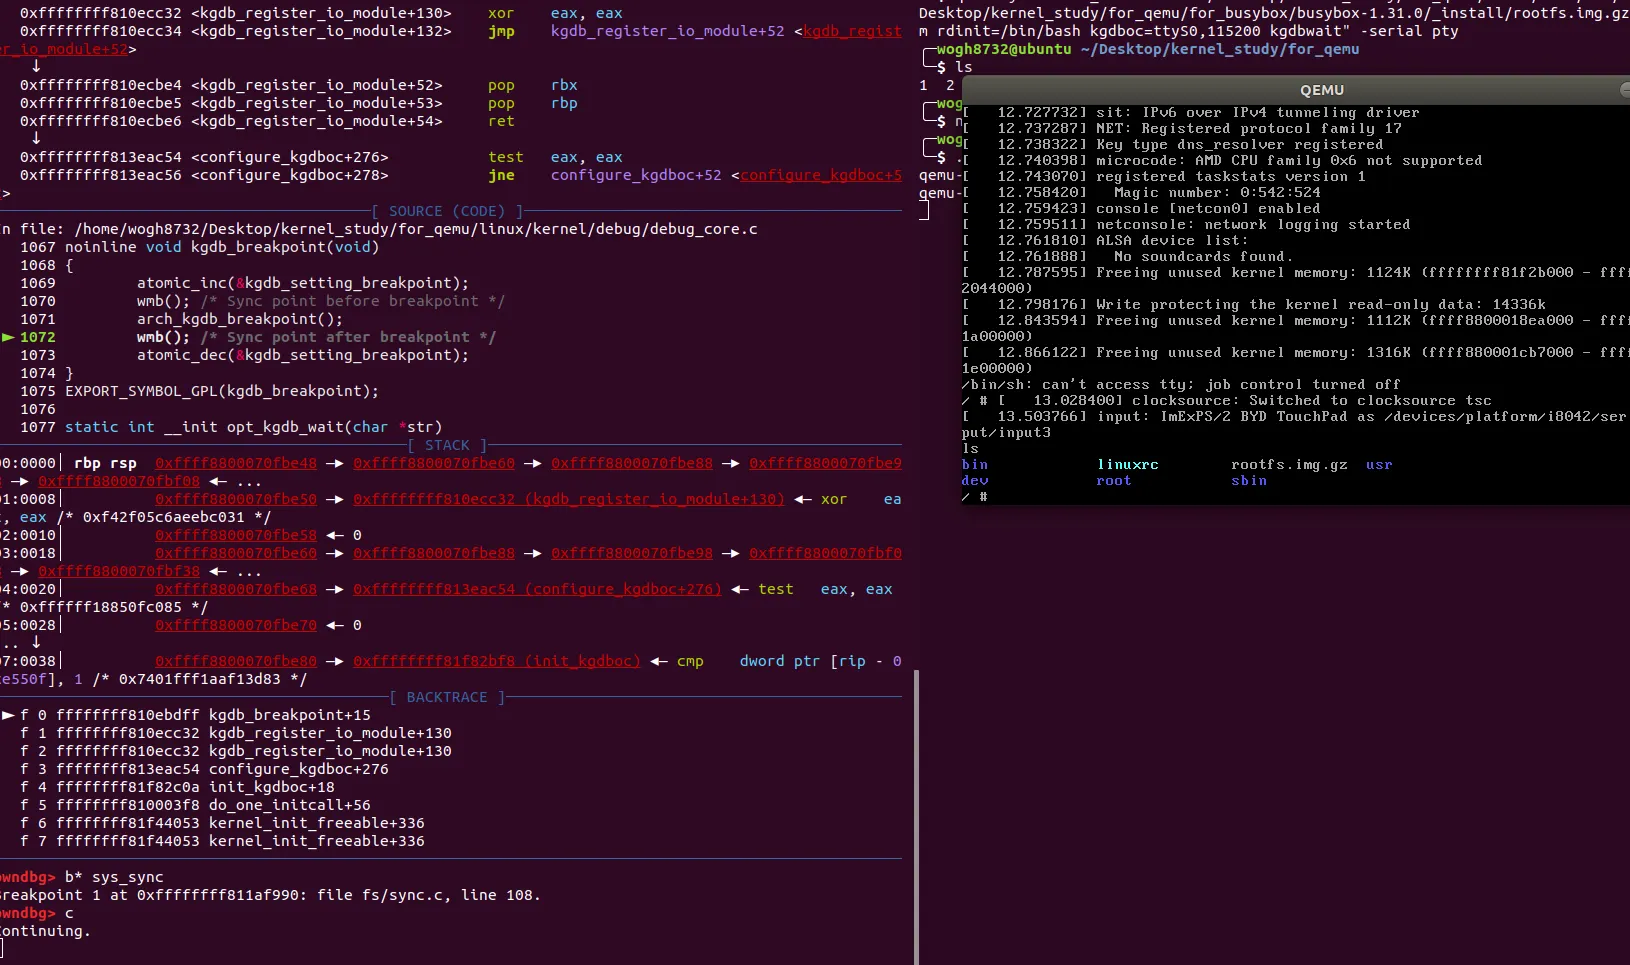
c를 하면 qemu가 다시 가동되면서 쉘이 실행된다. 이제 터미널에서 time을 입력하면, syscall인 sys_sync 함수에서 bp가 걸릴것이다. 즉 system call 디버깅 가능. 보통 user 단에서 어셈으로 보면 syscall 했을때 trap 걸리면서 커널영역으로 넘어간뒤, 커널에서 처리하는데 바로 밑에가 커널에서 처리하는 시스템콜 로직임.(sys_sync) 자세한건 여기서 확인하면 된다.
이렇게 커널디버깅을 하면된다. 앞으로 커널 익스를 공부할때 커널 모듈을 디버깅하기 위해 정리를 했다. 실제 CTF문제의 환경세팅이랑은 많이 다른거같은데, 앞으로 새로운 방법들은 추가적으로 정리할 예정이다. 커널 디버깅 방법도 많이 때문임.